
CodeSmith基础(一)
2005-12-19 13:57 努力学习的小熊 阅读(64541) 评论(43) 收藏 举报
请大家耐心看完所有的基础文章,前两篇网上发表的比较多,是CodeSmith英文帮助文档的第一篇,我后面写的基础是将其他所有的英文帮助全部翻译出来了,全部为本人手写翻译,希望对大家有所帮助
创建好一个模板后第一步要指明这是一个C#语言的模板。
 <%@ CodeTemplate Language="C#" TargetLanguage="C#"
Description="Generates a class including a special informational header" %>
第二步,我们要指明模板在生成代码时的属性,即生成代码需要的输入值变量。
我们可以按照C#语言的语法去使用定义的变量,例如:
例如下面这个例子模板使用了上面介绍的知识。Test.cst
生成后的代码即可放入Visual Studio .NET中使用,我们使用CodeSmith的目的就是为了快速高效的开发。
创建好一个模板后第一步要指明这是一个C#语言的模板。
<%@ CodeTemplate Language="C#" TargetLanguage="C#" Description="Generates a class including a special informational header" %>第二步,我们要指明模板在生成代码时的属性,即生成代码需要的输入值变量。
<%@ Property Name="NameSpace" Type="String"
Category="Context"
Description="The namespace to use for this class" %>
如上边所示,在进行代码生成时,在CodeSmith Explorer中选择模板后生成代码的窗口中,变量的名称为NameSpace,类型是String,类别是Context,当用户选中这个属性时对于属性的描述Description。Category="Context"
Description="The namespace to use for this class" %>
我们可以按照C#语言的语法去使用定义的变量,例如:
///////////////////////////////////////////////////////////////////////////////////////
// File: <%=ClassName%>.cs
// File: <%=ClassName%>.cs
例如下面这个例子模板使用了上面介绍的知识。Test.cst
<%@ CodeTemplate Language="C#" TargetLanguage="C#"
Description="Generates a class including a special informational header" %>
<%@ Property Name="NameSpace" Type="String"
Category="Context"
Description="The namespace to use for this class" %>
<%@ Property Name="ClassName" Type="String"
Category="Context"
Description="The name of the class to generate" %>
<%@ Property Name="DevelopersName" Type="String"
Category="Context"
Description="The name to include in the comment header" %>
///////////////////////////////////////////////////////////////////////////////////////
// File: <%=ClassName%>.cs
// Description: Enter summary here after generation.
// ---------------------
// Copyright © <%= DateTime.Now.Year %> Our Client
// ---------------------
// History
// <%= DateTime.Now.ToShortDateString() %> <%= DevelopersName%> Original Version
///////////////////////////////////////////////////////////////////////////////////////
using System;
namespace <%=NameSpace %>
{
/// <summary>
/// Summary description for <%=ClassName %>.
/// </summary>
public class <%=ClassName %>
{
public <%=ClassName %>()
{
//
// TODO: Add constructor logic here
//
}
}
}
然后我们在CodeSmith Explorer中双击这个模板就会看到相应的属性界面,这里的属性均是我们在前边定义的属性。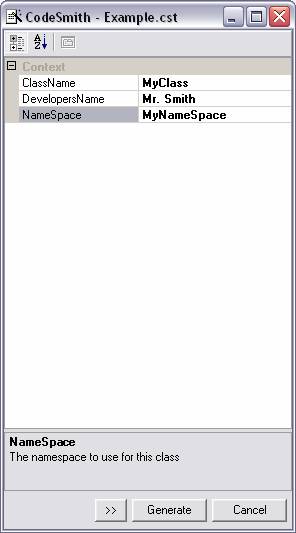
按下Generate按钮生成,即可实现一个简单的类代码的生成。
1 ///////////////////////////////////////////////////////////////////////////////////////
2// File: MyClass.cs
3// Description: Enter summary here after generation.
4// ---------------------
5// Copyright © 2003 Our Client
6// ---------------------
7// History
8// 12/2/2003 Mr. Smith Original Version
9///////////////////////////////////////////////////////////////////////////////////////
10
11using System;
12
13namespace MyNameSpace
14{
15 /// <summary>
16 /// Summary description for MyClass.
17 /// </summary>
18 public class MyClass
19 {
20 public MyClass()
21 {
22 //
23 // TODO: Add constructor logic here
24 //
25 }
26 }
27 }
}
///////////////////////////////////////////////////////////////////////////////////////
2
// File: MyClass.cs3
// Description: Enter summary here after generation.4
// ---------------------5
// Copyright © 2003 Our Client6
// ---------------------7
// History8
// 12/2/2003 Mr. Smith Original Version9
///////////////////////////////////////////////////////////////////////////////////////10
11
using System;12
13
namespace MyNameSpace14
{
15
/// <summary>
16
/// Summary description for MyClass.17
/// </summary>18
public class MyClass19
{20
public MyClass()21
{22
//23
// TODO: Add constructor logic here24
//25
}26
}27
}生成后的代码即可放入Visual Studio .NET中使用,我们使用CodeSmith的目的就是为了快速高效的开发。

 浙公网安备 33010602011771号
· Java线程池详解:高效并发编程的核心利器
· 从“看懂世界”到“改造世界”:AI发展的四个阶段你了解了吗?
· 协程本质是函数加状态机——零基础深入浅出 C++20 协程
· 编码之道,道心破碎。
· 记一次 .NET 某发证机系统 崩溃分析
· dotnetty 新的篇章- 开源
· 这5种规则引擎,真香!
· DotTrace系列:1. 理解四大经典的诊断类型(上)
· 【大数据高并发核心场景实战】 - 数据持久化之冷热分离
· 如何用大语言模型提取任意文档中的知识点